Bubble Point Testing
Syringe filters are how our compounded preparation achieves sterilization. Bubble point testing is how we verify that our filters maintained integrity during the filtration/sterilization process.
Especially in lieu of more formal sterility assurance testing, bubble point tests are our primary method for determining if our compounded preparations are indeed sterile.
A bubble point test will render your filter no longer sterile. Once you do the test, it’s important to discard the filter. Read more below.
Bubble point tests are standard in lab settings, however this particular methodology for doing them seems to have come from HRT Cat.
Diagram
Concept
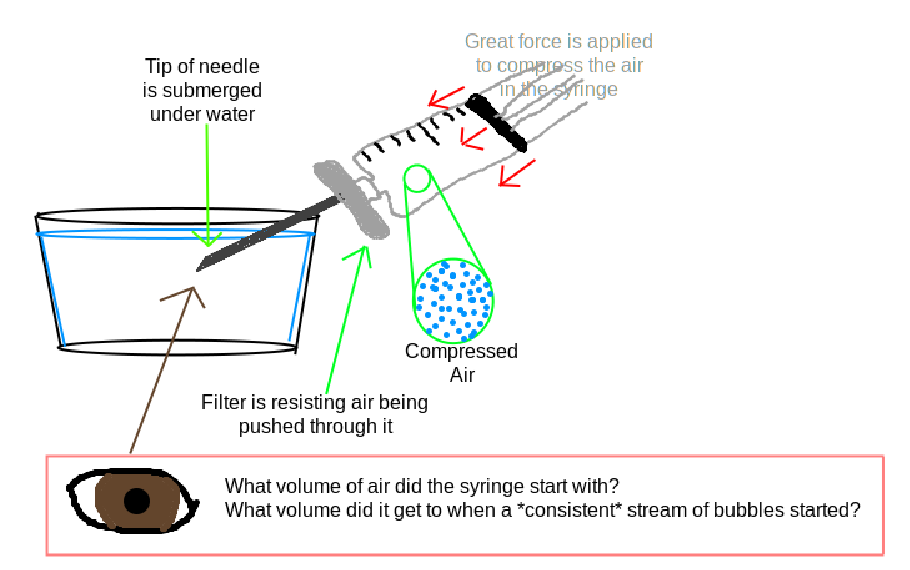
A syringe filter that is wetted with the preparation you’ve made will resist air being pushed through the membrane of the filter. However, once a significant enough amount of pressure of air is being pushed through the filter, eventually the filter will give way and let the air begin to pass.
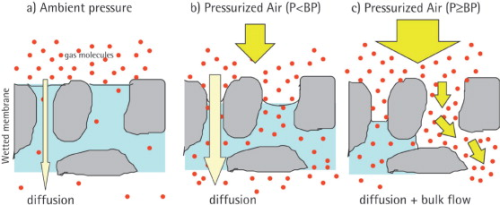
So what we’re doing is checking at what specific pressure did the filter membrane begin to let air through. All filters of the same manufacturing batch, that are without defect, and are wetted with the same substance should begin to let air pass at roughly the same pressure.
We can use this info to check, then, if the filter broke or degraded during the filtration process.
We dip the end of a needle that comes out of this filter into a cup of water so that we can see when air begins to escape the filter.
Preparing a New Batch of Filters
From your new batch of filters, take as little as one, but as many as three filters. Pass a small amount of the compounded preparation through them, to the point where the liquid is going into the filter and is coming out the other side. This is considered “wetting” the filter, so that all of its pores are saturated in the compounded preparation.
Now that the filters are wetted, check their bubble point, taking the average of the three, and discarding any outliers.
How to actually do the bubble point test
- Find the current air pressure. At sea level this averages at about 14.7psi. You can lookup the current air pressure where you’re at with a weather site.
- Take a large syringe, such as 20mL. Fill it up with air to a benchmark of your choice. I always fill up to 15mL of air, every time, for consistency
- Attach your used filter you want to test. (The filter must have had your preparation passed through it so that the pores are saturated).
- Attach a large gauge needle, such as 18g, to the end of the filter
- Submerge the needle in a glass of water, but not letting the filter touch the water.
- Compress the air in the syringe, trying to push the air through the filter and into the water
- Keep pressing down, remembering what mL you started at, and watching for a steady stream of bubbles to come out of the needle. A few bubbles is fine, and not relevant, you’re looking for a stream.
- Make note of what mL you were compressed to when the stream of bubbles started.
- You’re done.
Because I always start at 15mL of air, I know without doing math, that depending on my filter batch, my target bubble point of an in-tact filter is usually around 4mL (about 55psi).
Now you need to do a little bit of math to convert these values into a PSI bubble point. Open up the Boyle’s Law Calculator . Use today’s air pressure according to the weather as the starting pressure, use your starting volume in the syringe, and the volume where you saw the stream of bubbles appear. You should then be given a “final pressure” that tells you what the bubble point is.
You can now determine if your filter held up during its filtration. You should discard the filter and not use it again.
My bubble point is less than it’s supposed to be
Sometimes your bubble point turns out to be 45psi when it’s supposed to be 55psi, for example. Other times, you’ll see something more dramatic, and your bubble point will be 25psi when it’s supposed to be 55psi.
With the 25psi value, it’s safe to say that your filter broke in some way during filtration, and that the batch you filtered needs to be refiltered as it cannot be considered sterile.
When the deviation is smaller, that’s a tougher decision. I try to consider that my bubble point needs to be consistently at the benchmark I set for the batch of filters, in this example, that’s 55psi. So anything less and I consider that something might have gone wrong, I might have broken the filter somehow, or it was just a bad filter from the factory.
Someone less risk adverse than myself might consider that a small deviation is fine, and they want to consider the filtered preparation sterile. I have no data backing this up, and don’t know how to reliably tell what the cut-off is with bubble points. So my best advice is to stick to the bubble point you expect to get, and whether it’s a large or small deviation you should refilter if needed.
This test renders filters unsterile
With a large amount of pressure pushed up against the filter, and the needle leaving the filter being in unsterile water, if there is even the slightest decrease in pressure from your hand wavering or getting tired, while the needle is under water, you can notice that the needle will suck up a tiny bit of water.
This water is unsterile and impossible to get out of the exit side of the filter. Any sterile preparation that is passing through the filter now could be coming into contact with this water, effectively making the preparation unsterile.